Key takeaways
- Passive Splitters (1-to-2 and 1-to-3 cables): These cables draw all their power directly from the motherboard header. They are ideal for small fan clusters (such as a dual-fan radiator or a pair of front intake fans). Because typical modern fans draw between 0.10A and 0.25A, you can safely connect up to three standard fans to a single 1.0A header using a passive splitter without risking an over-current event.
- Active Powered Hubs (1-to-5 up to 1-to-10 blocks): If you need to connect four or more fans to a single control source, you must use an active hub. These devices plug into a motherboard header for the control signal (PWM) and tachometer feedback, but they pull their actual electrical power directly from your system’s Power Supply Unit (PSU) via a SATA or Molex power connector. A SATA power connector can safely deliver up to 4.5 Amps, allowing you to run up to nine or ten high-performance fans safely.
What's inside
It is one of the most common, frustrating moments in PC building: you have carefully selected your chassis, your high-airflow fans, and your premium motherboard, only to realize you are out of fan headers. To resolve this, most builders look for a quick, cheap fix. However, buying the wrong fan splitter can result in more than just messy cable management—it can lead to uncontrollable fan speeds, loud acoustic whine, or even a fried motherboard header.
The most frequent mistake builders make when researching how to choose pc fan splitter setups is ignoring the electrical limitations of their motherboard. A standard fan header is not a bottomless well of power. Overloading it with too many high-draw fans can permanently damage your board’s circuitry. Another frequent error is buying a splitter that sends multiple speed signals back to a single header, causing your BIOS to misread the fan RPM entirely and spin your fans at 100% capacity constantly. To build a quiet, efficient, and safe system, you need to look past the low price tag and understand the underlying specifications.
As an Amazon Associate we earn from qualifying purchases at no extra cost to you. Product prices and availability are accurate as of the date shown and are subject to change.


Decide These 3 Things First
Before you add any cable to your shopping cart, you must establish three baseline parameters of your PC build. Knowing these details upfront will instantly narrow down your choices and prevent hazardous hardware configurations.
- Your Motherboard Header’s Amp Limit: Almost all standard system fan headers (labeled SYS_FAN or CHA_FAN) are rated for exactly 1.0 Amp (1.0A) of current. Some specialized water pump headers (W_PUMP) can handle 2.0A or 3.0A. You must check your motherboard manual to verify this limit.
- The Power Draw of Your Fans: Look at the sticker on the back of your fan motor hub. You will see a current rating listed in Amperes (e.g., 0.08A, 0.15A, or 0.30A). The combined amperage of all fans connected to a single splitter must never exceed 80% of your motherboard header’s rated limit to ensure safe continuous operation.
- Control Type (PWM vs. DC): Are your fans 4-pin Pulse Width Modulation (PWM) fans or older 3-pin Direct Current (DC) fans? A 4-pin fan can run on a 3-pin splitter, and vice versa, but you will lose precise speed control. You must match the splitter’s pin configuration to your fan type to maintain control over your system’s acoustics.
1. Pin Configuration and Tachometer Feedback
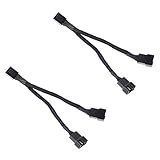
When you look closely at a high-quality 1-to-3 or 1-to-2 fan splitter, you will notice something odd: only one of the male output connectors actually has all 4 pins. The other connectors will have only 3 pins, missing the third pin (the tachometer/RPM reading pin).
This is not a manufacturing defect; it is a critical design feature. A motherboard header can only read and interpret one RPM speed signal at a time. If a splitter sent speed signals from three different fans down the same wire simultaneously, the motherboard would receive a garbled, overlapping signal. This causes erratic fan behavior, safety shutdowns, or constant full-speed operation.
When choosing a splitter, ensure that only one male connector features the tachometer wire (typically colored yellow or green in unsleeved cables). The remaining connectors should only pass through the Power, Ground, and PWM control signals. If you buy a cheap splitter where every single connector has 4 physical pins connected to the main wire, return it immediately.
2. Passive Splitters vs. Active Powered Hubs
As PC cases in 2026 feature increasingly complex multi-chamber layouts requiring six, nine, or even twelve fans, the traditional passive splitter cable has its limits. You must choose between a passive cable splitter and an active powered hub based on your fan count.
- Passive Splitters (1-to-2 and 1-to-3 cables): These cables draw all their power directly from the motherboard header. They are ideal for small fan clusters (such as a dual-fan radiator or a pair of front intake fans). Because typical modern fans draw between 0.10A and 0.25A, you can safely connect up to three standard fans to a single 1.0A header using a passive splitter without risking an over-current event.
- Active Powered Hubs (1-to-5 up to 1-to-10 blocks): If you need to connect four or more fans to a single control source, you must use an active hub. These devices plug into a motherboard header for the control signal (PWM) and tachometer feedback, but they pull their actual electrical power directly from your system’s Power Supply Unit (PSU) via a SATA or Molex power connector. A SATA power connector can safely deliver up to 4.5 Amps, allowing you to run up to nine or ten high-performance fans safely.
3. Cable Length, Flexibility, and Wire Gauge
Internal PC cable routing requires precision. A fan splitter that is too short will pull tight against your motherboard components, while one that is too long will create a cluttered rat’s nest behind your motherboard tray, blocking airflow and complicating side panel closure.
Standard passive fan splitters typically measure between 10 inches (25 cm) and 12 inches (30 cm) in length. This is the optimal sweet spot for mid-tower ATX cases, allowing you to route the cable from the motherboard header, behind the tray, and out to your fan frames. For massive full-tower cases or dual-system builds, look for 18-inch (45 cm) options to avoid tension.
Pay close attention to the wire gauge used in the splitter’s construction. Look for cables constructed with 26 AWG (American Wire Gauge) or thicker 24 AWG copper wire. Avoid ultra-thin 28 AWG wire, as it has higher electrical resistance, runs hotter under load, and is much more prone to snapping at the solder joints when bent around tight cable routing channels.
4. Insulation, Sleeving, and Aesthetic Construction
Because fan cables are often visible through tempered glass side panels, the physical construction of the splitter matters for both durability and aesthetics. There are three primary types of cable finishes available:
Bare PVC Ribbon Cables: These are flat, unsleeved cables, often colored solid black or the classic “ketchup-and-mustard” red, yellow, black, and green. While highly flexible and budget-friendly, they offer zero protection against sharp metal edges inside your chassis and can easily get pinched or cut during installation.
High-Density Nylon Sleeving: This is the gold standard for custom and premium PC builds. The wires are enclosed in a tightly braided nylon mesh sleeve, secured at the ends with heat-shrink tubing. Nylon sleeving protects the delicate internal copper wires from friction, keeps the wires bundled neatly, and hides unsightly colored wires behind a clean, matte-black finish.
Flat Ribbon Rubberized Cables: Often found on premium mid-range splitters, these cables fuse the individual wires together in a flat, ultra-flexible rubber ribbon. They are incredibly easy to route through tight 90-degree corners and lay completely flat against the motherboard tray, making them excellent for stealthy cable management.
5. Price Tiers and Packaging Value
The PC fan splitter market is highly commoditized, meaning you do not need to spend a fortune to get a safe, reliable product. However, pricing tiers do dictate the overall build quality and quantity you receive.
- Budget Tier ($4.00 – $6.00): In this price range, you will typically find multipacks (often 2-packs or 3-packs) of simple 1-to-2 or 1-to-3 splitters. These often feature basic plastic connectors and minimal or thin sleeving. Brands like JBtek and Mbiydeg dominate this space, offering excellent utility for standard builds where cables are hidden from view.
- Mid-Range Tier ($7.00 – $12.00): This tier features premium-branded cables from established accessory makers like Cable Matters or Noctua. These cables use thicker 24 AWG wire, flawless high-density black sleeving, and snug-fitting connectors that won’t wiggle loose over time. You can also find basic 1-to-5 powered SATA hubs in this price bracket.
- Premium Tier ($15.00+): This tier is reserved for advanced, multi-port active PWM hubs with magnetic mounts, solid aluminum casings, built-in capacitors for power filtering, and dedicated software integration. These are designed for complex liquid-cooling loops and heavy RGB setups where precise, synchronized control is mandatory.
Spec Checklist
Use this quick-reference table to match your specific system design requirements with the correct fan splitter specifications.
| Feature/Spec | Budget Setup (1-2 Fans) | Mid-Range Setup (3-4 Fans) | Premium Setup (5+ Fans / RGB) |
|---|---|---|---|
| Passive Y-Splitter (1-to-2) | Passive 3-Way Splitter (1-to-3) | Active SATA-Powered Hub | |
| Motherboard Header (1.0A max) | Motherboard Header (1.0A max) | SATA 15-Pin Power (4.5A max) | |
| 26 AWG or 28 AWG | 26 AWG or 24 AWG | 24 AWG or 22 AWG | |
| Bare PVC or light mesh | High-Density Nylon Sleeved | Double-Braided Nylon or Shielded | |
| 3-Pin DC or 4-Pin PWM | True 4-Pin PWM Control | PWM with Independent Channel Control | |
| $4.00 – $6.00 (multi-packs) | $7.00 – $12.00 | $15.00 – $35.00 |
Red Flags
When shopping for a fan splitter, avoid products that exhibit any of the following warning signs:
- All Connectors Have 4 Pins Wired: If a 1-to-3 or 1-to-4 passive splitter has the tachometer (RPM) pin wired on every single male connector, it is poorly engineered. Your motherboard will receive multiple conflicting speed signals, rendering automated fan curves useless.
- Extremely Cheap Multi-Port Passive Splitters (1-to-5 with no SATA power): Any passive splitter that attempts to run four or five fans off a single motherboard header without an external SATA or Molex power connection is an electrical hazard. Running this setup can easily pull over 1.2 Amps, which will degrade or instantly burn out a standard 1.0A motherboard header.
- Loose Pin Terminals: If the metal pins inside the plastic female housing wiggle freely or slide out of the plastic casing when gently tugged, the crimping is substandard. Loose pins can cause intermittent power delivery, causing your fans to stutter, stop spinning, or spark.
- Unlabeled Wire Gauges: If a manufacturer completely hides or refuses to state the wire gauge (AWG) of their splitter, they are likely using cheap, thin copper-clad aluminum (CCA) wires instead of pure copper, which increases electrical resistance and fire risk under load.
FAQ
Can I connect a 3-pin fan to a 4-pin PWM fan splitter?
Yes, you can physically connect a 3-pin fan to a 4-pin splitter. The plastic keyway on the connector will guide it so that the Ground, Power, and Tachometer pins align correctly. However, because the 3-pin fan lacks the internal motor circuitry required for PWM control, it will run at 100% full speed constantly unless your motherboard bios supports changing that specific header’s control mode from “PWM” to “DC” (voltage control).
What happens if I exceed the 1.0 Amp limit on my motherboard fan header?
Exceeding the 1.0A limit will cause the header’s transistor to overheat. Modern premium motherboards may have over-current protection (OCP) that will simply trip and disable the header temporarily until the system is power-cycled. However, on budget or older motherboards, exceeding the limit will permanently burn out the header, sometimes resulting in physical smoke, a burnt plastic smell, and permanent damage to adjacent motherboard traces.
Why is my motherboard only showing the speed of one fan on my splitter?
This is by design. A motherboard header can only read one RPM signal at a time. The splitter is built with only one “master” connector that sends its speed signal back to the motherboard. The motherboard adjusts the power output based on that single fan’s speed, and the other “slave” fans connected to the splitter simply mimic that power level. If your fans are identical, they will all spin at roughly the same speed.
Should I choose a SATA-powered fan hub or a simple cable splitter?
Choose a simple cable splitter if you are only connecting two or three low-power fans (under 0.25A each) to a single area of your case, as it is cheaper and requires no extra power cables. Choose a SATA-powered hub if you are installing four or more fans, high-amperage industrial fans, or if you want to centralize your entire case cooling system into a single cable management zone behind the motherboard tray.